How to automatically deploy a passwordless Azure SQL Server
A step by step guide
Table of Contents
The Story
I have been working a lot with cloud platforms - needing ephemeral resources that spin up (or delete) at the drop of a hat. Additionally, in a world of increasingly tighter compliance & security concerns including change management, deploying resources in an automatic, reproducible, and auditable way is more important than ever.
My task was to spin up an Azure SQL Server using the tools that my team uses - all automatically. However, the way of doing this has changed over the years and the knowledge and documentation of doing so is all over the place. I’ve written this to compile a dozen different places (Microsoft documentation, StackOverflow, ChatGPT, Reddit, etc.) into one place.
Overview
The code for this post (and in all the examples below) is available here.
Here’s the end-to-end toolchain we are using and which the post will use:
- .NET 8
- Entity Framework Core (with its built-in migrations)
- Bicep
- Azure DevOps
- Azure
Overall, the end-state architecture is created to satisfy a process that requires two developers to approve a pull request, and a manager to approve changes. Upon merge into main, the infrastructure-as-code is deployed out via a pipeline where the database is created and permissions are set. This is reflected in the following diagram:
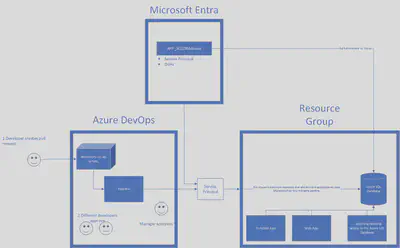
Yours might differ but this is what is being built and hopefully you can pull most of the pieces of this.
Assumptions
I’ve made a few assumptions in order to keep this post focused specifically on Azure SQL Server. They are:
- You already have a resource group in Azure.
- There is an existing service connection in Azure that ties back to Azure DevOps so you can deploy your infrastructure-as-code to the resource group.
- You have an existing user-managed identity with
User.Read.All,GroupMember.Read.All, andApplication.Read.Allpermissions that you are able to use as the primary user managed identity for the database. This is necessary (and shown in use later) to be able to create users in the database from Entra. Unsure what this is? Click here.
The C# Code
If you already have Entity Framework Core setup, skip to Making a Migration.
Entity Framework Core Setup
From a brand new dotnet new webapi application, add the following NuGet packages
  Microsoft.EntityFrameworkCore.SqlServer
  Microsoft.EntityFrameworkCore.Tools
Create a DbContext and add any associated database models.
// AzureSqlDbContext.cs

public class AzureSqlDbContext(DbContextOptions<AzureSqlDbContext> options) : DbContext(options)
{
    public DbSet<Todo> Todos { get; set; }
}

public class Todo
{
    public int Id { get; set; }
    public required string Name { get; set; }
}
Inside of Program.cs, register your DbContext to your services.
builder.Services.AddDbContext<AzureSqlDbContext>(options => options.UseSqlServer(builder.Configuration.GetConnectionString("AzureSql")));
Making a Migration
If you already have Migrations setup, skip to The Infrastructure (as code).
Navigate to your .csproj and run the following migration command, where InitialCreate is the name of your migration, and run the following command
dotnet ef migrations add InitialCreate -o ./Migrations
The Infrastructure (as code)
The bicep isn’t too bad once you know which properties of Microsoft.Sql/servers need to be included or not (which is an arcane mess). Below is the bicep file with comments added explaining each resource.
// main.bicep

param applicationDatabaseAdminsGroupName string
param applicationDatabaseAdminsObjectId string
param deployEnvironment string

var appName = 'azuresql'
#disable-next-line no-hardcoded-location
var location = 'North Central US'

// Already created & must have ability to read Entra. `User.Read.All`, `GroupMember.Read.All`, and `Application.Read.All` permissions.
resource dbIdentity 'Microsoft.ManagedIdentity/userAssignedIdentities@2023-07-31-preview' existing = {
  name: '${deployEnvironment}-${appName}-dbumi-01'
}

// Create the sql server.
resource sqlServer 'Microsoft.Sql/servers@2023-05-01-preview' = {
  name: '${deployEnvironment}-${appName}-dbs-01'
  location: location
  identity: {
    type: 'UserAssigned'
    userAssignedIdentities: {
      '${dbIdentity.id}': {}
    }
  }
  properties: {
    administrators: {
      // Only allow Azure AD connections (passwordless)
      azureADOnlyAuthentication: true
      // The server administrator - we are passing the Entra Object Id which correlates to an Entra Group called `APP_SQLDbAdmins
      sid: applicationDatabaseAdminsObjectId
      // The login name of the server administrator group.
      login: '${deployEnvironment}-${applicationDatabaseAdminsGroupName}'
    }
    // This identity will be used when determining what in Azure the identity can see - which is why we need User.Read.All, etc. in order to CREATE EXTERNAL USER's from Entra.
    primaryUserAssignedIdentityId: dbIdentity.id
  }

  // Create the sql server database.
  resource sqlServerDatabase 'databases' = {
    name: '${deployEnvironment}-${appName}-db-01'
    location: location
    sku: {
      name: 'Basic'
      tier: 'Basic'
    }
  }
}
var sqlServerName = '${sqlServer.name}${environment().suffixes.sqlServerHostname}'
output sqlServerName string = sqlServerName
output sqlServerDatabaseName string = sqlServer::sqlServerDatabase.name

// Create the application service plan and the web application.
resource appServicePlan 'Microsoft.Web/serverfarms@2022-03-01' = {
  name: '${deployEnvironment}-${appName}'
  location: location
  sku: {
    name: 'B1'
  }
}

// This application identity is permissioned into the database. You could use a system-assigned identity from the web app as long as you don't have additional things this identity needs.
resource applicationIdentity 'Microsoft.ManagedIdentity/userAssignedIdentities@2023-07-31-preview' = {
  name: '${deployEnvironment}-${appName}-appumi-01'
  location: location
}
output applicationIdentityName string = applicationIdentity.name

resource webApp 'Microsoft.Web/sites@2022-03-01' = {
  name: '${deployEnvironment}-ncus-${appName}-app-01'
  location: location
  properties: {
    httpsOnly: true
    serverFarmId: appServicePlan.id
    siteConfig: {
      appSettings: [
        {
          name: 'ConnectionStrings__AzureSqlDatabase'
          value: 'Server=tcp:${sqlServerName},1433;Initial Catalog=${sqlServer::sqlServerDatabase.name};Authentication=Active Directory Default;Encrypt=True;MultipleActiveResultSets=True;'
        }
        {
          name: 'AZURE_CLIENT_ID'
          value: applicationIdentity.properties.clientId // See https://github.com/MicrosoftDocs/azure-docs/issues/105359
        }
      ]
    }
  }
  identity: {
    type: 'UserAssigned'
    userAssignedIdentities: {
      '${applicationIdentity.id}': {}
    }
  }
}
The Initial Creation SQL Script
After the database exists, we need to run an initial script that will permission both the application that needs to perform CRUD operations on the database, as well as the product team itself that owns it so they can support it. In the following script, the development (dev) environment will grant the product team dbo, whereas any other environment will be db_datareader.
-- initialcreate.sql

-- $(productTeamIdentity), $(env) and $(applicationIdentity) are replaced in the pipeline.
-- Example: $(productTeamIdentity) is replaced with an Entra Group called `Products Team`, which contains a group of users responsible for the application.
-- Example: $(applicationIdentity) would be replaced with the name of the user-managed identity resource created in the infrastructure as code (dev-azuresql-umi-01) which the application is running as.

IF NOT EXISTS(SELECT * FROM sys.database_principals WHERE [name] = $(productTeamIdentityName))
BEGIN
    EXECUTE('CREATE USER [' + $(productTeamIdentityName) + '] FROM EXTERNAL PROVIDER');
END;

IF NOT EXISTS(SELECT * FROM sys.database_principals WHERE [name] = $(applicationIdentity))
BEGIN
    EXECUTE('CREATE USER [' + $(applicationIdentityName) + '] FROM EXTERNAL PROVIDER');
END;
GO

IF ($(env) = 'dev')
    BEGIN
        ALTER AUTHORIZATION ON SCHEMA::[dbo] TO $(productTeamIdentityName)
    END
ELSE
    BEGIN
        ALTER AUTHORIZATION ON SCHEMA::[db_datareader] TO $(productTeamIdentityName)
    END

ALTER AUTHORIZATION ON SCHEMA::[db_datareader] TO $(applicationIdentityName)
ALTER AUTHORIZATION ON SCHEMA::[db_datawriter] TO $(applicationIdentityName)

GO
The Azure Pipeline
Generating Scripts & Publishing
In your Azure Pipeline, you’ll want to have a task to generate the EF Core Migration script that will be applied to the database. The following is an example
# azure-pipelines.yaml

# install the dotnet-ef tool which is used to generate migrations.
- script: dotnet tool install --global dotnet-ef
  displayName: Install .NET EF Core tools
# Run a custom dotnet command, which we're choosing to run migrations.
- task: DotNetCoreCLI@2
  displayName: 'Create migration'
  inputs:
    command: custom
    custom: ef
    arguments: 'migrations script --idempotent --project src/WebApplication --output $(Build.ArtifactStagingDirectory)/Migrations/migration.sql'
Lets break down the arguments of the migration script.
- The
--projectargument specifies the path where the migration project is located. - The
--outputargument specifies where to output the file. - The
--idempotentargument specifies to create a script that will apply only the migrations that have not yet been applied.
For more information on these parameters or all available parameters, click here.
A simple example of the “complete” build stage might look like the following
# azure-pipelines.yaml

- stage: Build
  jobs:
  - job:
    pool:
      vmImage: ubuntu-latest
    displayName: Publish
    steps:
    - task: DotNetCoreCLI@2
      displayName: dotnet publish
      inputs:
        command: 'publish'
        publishWebProjects: true
        arguments: '-o $(Build.ArtifactStagingDirectory)'
        modifyOutputPath: false
    - script: dotnet tool install --global dotnet-ef
      displayName: dotnet tool install dotnet-ef
    - task: DotNetCoreCLI@2
      displayName: Create migration
      inputs:
        command: custom
        custom: ef
        arguments: 'migrations script --idempotent --project src/WebApplication --output $(Build.ArtifactStagingDirectory)/Migrations/migration.sql'
    - publish: $(Build.ArtifactStagingDirectory)
      displayName: Publish to Azure DevOps
      artifact: drop
Deploying All The Things
For the next stage, we need to actually do the deploy. We need to:
- Deploy the infrastructure
- Deploy the initial scripts that will permission the product team as well as the application to be able to communicate with the database.
- Deploy the migration scripts we generated earlier in the build phase.
- Deploy the web application
This stage might look like the following which is embedded with comments explaining portions of it
# azure-pipelines.yaml

- stage: Deploy_NonProd
  dependsOn: Build
  jobs:
  - job: deploy
    pool:
      vmImage: windows-latest
    steps:
      # First, deploy the infrastructure setup in the bicep file. Our bicep file outputs some variables, which we capture in $jsonResult and set them as pipeline variables.
      - task: AzureCLI@2
        displayName: 'Deploy Infrastructure'
        inputs:
          # Replace `applicationDatabaseAdminsGroupName`, `applicationDatabaseAdminsObjectId`, and `azuresql` subscription name.
          # applicationDatabaseAdminsGroupName is the Entra group that contains the service principal doing the deploy as well as any additional users who would administrate the database. Example: APP_SqlDbAdmins
          # applicationDatabaseAdminsObjectId is the ObjectId of the group
          azureSubscription: azuresql-dev
          # I chose powershell because bash jsonifying is not as easy.
          scriptType: ps
          scriptLocation: inlineScript
          # Run the bicep file and write the output variables to Azure DevOps
          inlineScript: |
            $jsonResult = az deployment group create `
              --resource-group dev-ncus-azuresql-rg-01 `
              --template-file $(Build.SourcesDirectory)/iac/main.bicep `
              --parameters `
                  applicationDatabaseAdminsGroupName=App_SqlDbAdmins `
                  applicationDatabaseAdminsObjectId=37f7f235-527c-4136-accd-4a02d197296e `
                  deployEnvironment=dev `
              --mode Complete `
              | ConvertFrom-Json

            $sqlServerName = $jsonResult.properties.outputs.sqlServerName.value
            $sqlServerDatabaseName = $jsonResult.properties.outputs.sqlServerDatabaseName.value
            $applicationIdentityName = $jsonResult.properties.outputs.applicationIdentityName.value
            Write-Host "##vso[task.setvariable variable=sqlServerName;]$sqlServerName"
            Write-Host "##vso[task.setvariable variable=sqlServerDatabaseName;]$sqlServerDatabaseName"
            Write-Host "##vso[task.setvariable variable=applicationIdentityName;]$applicationIdentityName"
      - download: current # download the current repository so we can get the initialcreate.sql file.
        artifact: drop
      - task: SqlAzureDacpacDeployment@1
        displayName: 'Setup initial permissions'
        condition:
        inputs:
          azureSubscription: azuresql-dev
          authenticationType: 'servicePrincipal'
          deployType: 'sqlTask'
          serverName: $(sqlServerName)
          databaseName: $(sqlServerDatabaseName)
          # target the sql folder and find any sql files in there (will find initialcreate.sql)
          sqlFile: '$(Pipeline.Workspace)\**\sql\*.sql'
          # Pass arguments to the sql file. The -Variable argument will replace $() variables inside the sql file.
          # replace productTeamIdentityName with your Entra group containing your team.
          SqlAdditionalArguments: -Variable "productTeamIdentityName='Product Team'", "applicationIdentityName='$(applicationIdentityName)'", "env=dev"
      - task: SqlAzureDacpacDeployment@1
        displayName: 'Deploy EF Migration'
        inputs:
          azureSubscription: azuresql-dev
          authenticationType: 'servicePrincipal'
          deployType: 'sqlTask'
          serverName: $(sqlServerName)
          databaseName: $(sqlServerDatabaseName)
          sqlFile: '$(Pipeline.Workspace)\**\Migrations\migration.sql'
      - task: AzureWebApp@1
        displayName: Deploy Web Application
        inputs:
          appType: webApp
          azureSubscription: azuresql-dev
          appName: dev-ncus-azuresql-app-01
          package: $(Agent.BuildDirectory)/drop/WebApplication1/*.zip
Auditing (Optional)
I don’t really think auditing is optional but I left this part out of the rest of the Bicep because everyone has vastly different needs and use cases for auditing. However, the following should be able to get you started
// Rest of bicep
resource sqlServer 'Microsoft.Sql/servers@2023-05-01-preview' = {
  name: '${deployEnvironment}-${appName}-dbs-01'
  location: location
  identity: {
    type: 'UserAssigned'
    userAssignedIdentities: {
      '${dbIdentity.id}': {}
    }
  }
  properties: {
    administrators: {
      azureADOnlyAuthentication: true
      sid: applicationDatabaseAdminsObjectId
      login: '${deployEnvironment}-${applicationDatabaseAdminsGroupName}'
    }
    primaryUserAssignedIdentityId: dbIdentity.id
  }

  resource masterDb 'databases' = {
    name: ‘master’
    location: location
    properties: {}
  }

  resource sqlServerDatabase 'databases' = {
    name: '${deployEnvironment}-${appName}-db-01'
    location: location
    sku: {
      name: 'Basic'
      tier: 'Basic'
    }
  }
}

// Set up a log analytics workspace to ingest logs
resource logAnalyticsWorkspace 'Microsoft.OperationalInsights/workspaces@2022-10-01' = {
  name: '${deployEnvironment}-ncus-azuresql-law-01'
  location: location
  properties: {
    retentionInDays: 90
  }
}

resource sqlDiagnosticSettings ‘Microsoft.Insights/diagnosticSettings@2021-05-01-preview’ = {
  scope: sqlServer::masterDb
  name: 'sqlServerDiagnosticSettings'
  properties: {
    workspaceId: logAnalyticsWorkspace.id
    logs: [
      {
        // See more at https://learn.microsoft.com/en-us/azure/azure-sql/database/auditing-setup?view=azuresql#configure-auditing-for-your-server
        category: ‘SQLSecurityAuditEvents’
        enabled: true
      }
    ]
  }
}
That’s all for now. As a reminder, the entire code base can be found here. Happy coding!